2021. 8. 16. 20:06ㆍ그래픽스/vk
1. Image view and sampler
- 이번 챕터에서는 우리는 두개의 리소스를 더 만들것이다.
- 이것들은 graphics pipeline에서 필요하며, 한 이미지를 샘플링하는데 필요하다.
- 첫번째 리소스는 swapchain images로 작업하는 동안 이미 본것이지만
- 두번째 리소스는 새로운것이며, 셰이더가 이미지에서 texels을 읽는 방법과 관련이 있다.
2. Texture image view
- 이전에 swapchain images 그리고 framebuffer에서 보았듯이
- 이미지들은 직접 접근하지 않고 imageview들을 통해 접근한다.
- 그러므로 texture image를 위한 image view를 생성할 필요가 있다.
- texture image를 위한 VkImageView를 보유할 클래스멤버를 추가하고
- 이를 생성하는 새로운 함수 createTextureImageView를 만들것이다.
VkImageView textureImageView;

...

void initVulkan() {
    ...
    createTextureImage();
    createTextureImageView();
    createVertexBuffer();
    ...
}

...

void createTextureImageView() {

}
- 이 함수를 위한 코드는 createImageViews 를 기반으로한다.
- format 과 image 만 변경하면 된다.
VkImageViewCreateInfo viewInfo{};
viewInfo.sType = VK_STRUCTURE_TYPE_IMAGE_VIEW_CREATE_INFO;
viewInfo.image = textureImage;
viewInfo.viewType = VK_IMAGE_VIEW_TYPE_2D;
viewInfo.format = VK_FORMAT_R8G8B8A8_SRGB;
viewInfo.subresourceRange.aspectMask = VK_IMAGE_ASPECT_COLOR_BIT;
viewInfo.subresourceRange.baseMipLevel = 0;
viewInfo.subresourceRange.levelCount = 1;
viewInfo.subresourceRange.baseArrayLayer = 0;
viewInfo.subresourceRange.layerCount = 1;
- viewInfo.components 의 명시적인 초기화를 생략하였다. (VK_COMPONENT_SWIZZLE_IDENTITY)
- 마지막으로 vkCreateImageView를 호출함으로써 image view를 생성할 수 있다.
if (vkCreateImageView(device, &viewInfo, nullptr, &textureImageView) != VK_SUCCESS) {
    throw std::runtime_error("failed to create texture image view!");
}
- 기존의 createImageViews 와 논리적인 중복이 많으므로, 새로운 함수 createImageView 를 통해 추상화할 수 있다.
VkImageView createImageView(VkImage image, VkFormat format) {
    VkImageViewCreateInfo viewInfo{};
    viewInfo.sType = VK_STRUCTURE_TYPE_IMAGE_VIEW_CREATE_INFO;
    viewInfo.image = image;
    viewInfo.viewType = VK_IMAGE_VIEW_TYPE_2D;
    viewInfo.format = format;
    viewInfo.subresourceRange.aspectMask = VK_IMAGE_ASPECT_COLOR_BIT;
    viewInfo.subresourceRange.baseMipLevel = 0;
    viewInfo.subresourceRange.levelCount = 1;
    viewInfo.subresourceRange.baseArrayLayer = 0;
    viewInfo.subresourceRange.layerCount = 1;

    VkImageView imageView;
    if (vkCreateImageView(device, &viewInfo, nullptr, &imageView) != VK_SUCCESS) {
        throw std::runtime_error("failed to create texture image view!");
    }

    return imageView;
}
- 이제 createTextureImageView 함수는 간소화되었다.
void createTextureImageView() {
    textureImageView = createImageView(textureImage, VK_FORMAT_R8G8B8A8_SRGB);
}
- createImageViews 함수 또한 간소화되었다.
void createImageViews() {
    swapChainImageViews.resize(swapChainImages.size());

    for (uint32_t i = 0; i < swapChainImages.size(); i++) {
        swapChainImageViews[i] = createImageView(swapChainImages[i], swapChainImageFormat);
    }
}
- image view는 확실히 프로그램 종료시 image를 제거하기전에 제거해줘야한다.
void cleanup() {
    cleanupSwapChain();

    vkDestroyImageView(device, textureImageView, nullptr);

    vkDestroyImage(device, textureImage, nullptr);
    vkFreeMemory(device, textureImageMemory, nullptr);
3. Samplers
- 셰이더가 이미지에서 직접 텍셀을 읽는것이 가능하지만, 텍스처로 사용되는 경우에는 그리 일반적이지 않음.
- 텍스쳐들은 일반적으로 픽셀에 가정 적합한 색상을 계산하기 위해
- 데이터를 필터링 및 변환을 적용하는 sampler를 통해 접근되어진다.
(Textures are usually accessed through samplers,
which will apply filtering and transformations to compute the final color that is retrieved.)
3.1 Oversampling
- 이러한 필터들은 oversampling 과 같은 문제를 처리하는데 도움이 된다.
- texel 보다 fragments이 더 많은 지오메트리에 매핑되는 텍스쳐와 같은 경우
- 각 fragments의 텍스처 좌표에 대해 가장 가까운 texel을 취하기만하면 첫 번째 이미지와 같은 결과를 얻을 수 있다.
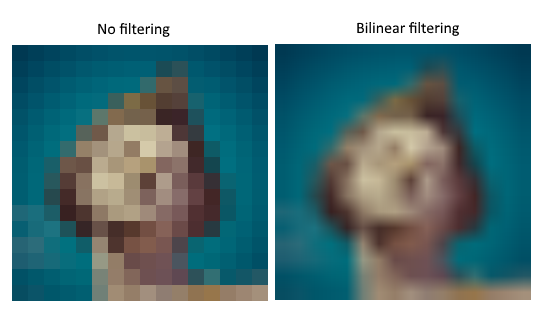
- 만일 선형보간을 통해 4개의 가장 가까운 texels을 결합하면, 오른쪽과같은 더 부드러운 결과를 얻게될것이다.
- 물론 응용프로그램에서의 art style 요구사항이 왼쪽 방식을 사용하는게 더 좋을 수 있다. (마인크래프트같은)
- 그러나 오른쪽 방식이 conventional graphics applications에서 더 선호된다.
- sampler object는 texture에서 색상을 읽을 때 자동으로 이 필터링을 적용한다.
3.2 Undersampling
- undersampling은 반대로 texels이 fragments 보다 더 많은경우 생기는 문제이다.
- 이것은 예각에서 바둑판 텍스처와 같은 high frequency patterns을 샘플링할때
- 눈에 띄는 artifacts를 발생시킨다.

- 왼쪽 이미지와 같이 텍스처가 멀리서 흐릿한 mess 로 변함.
- 해결법은 이방성 필터링anisotropic filtering을 적용시키는것이며, sampler에의해 자동적으로 적용될 수 도 있다.
(하지만 더 많은 리소스를 소비한다)
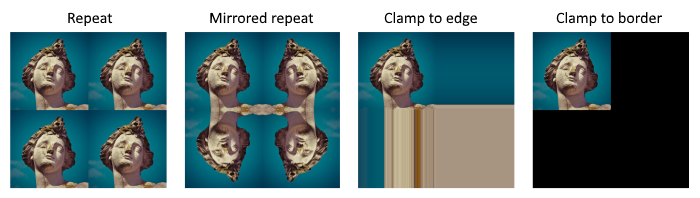
- 이러한 필터들 말고도 sampler는 transformations을 처리할 수 있다.
- 이것은 addressing mode를 통해 이미지 외부의 texel을 읽으려고할 때 어떤 일이 발생하는지 결정한다.
- 아래 이미지는 몇가지 가능성을 보여준다.
3.3 CreateTextureSampler
- 이제 함수 createTextureSampler 를 생성하여 sampler object를 설정하자.
- 나중에 sampler를 사용함으로써, 셰이더에서 texture로부터 색을 읽을 수 있을것이다.
void initVulkan() {
    ...
    createTextureImage();
    createTextureImageView();
    createTextureSampler();
    ...
}

...

void createTextureSampler() {

}
3.3.1 VkSamplerCreateInfo
- samplers 은 VkSamplerCreateInfo구조체를 통해 구성되어지며,
- 적용할 수 있는 모든 filters과 transformations를 지정할 수 있다.
VkSamplerCreateInfo samplerInfo{};
samplerInfo.sType = VK_STRUCTURE_TYPE_SAMPLER_CREATE_INFO;
samplerInfo.magFilter = VK_FILTER_LINEAR;
samplerInfo.minFilter = VK_FILTER_LINEAR;
- magFilter : magnified texels을 보간할 방법을 지정. (확대 필터를 VkFilter 값으로 지정)
- - - - Magnification 은 oversampling 문제와 관련이 있다.
- minFilter : minified texels을 보간할 방법을 지정. (축소 필터를 지정)
- - - - Minification 은 undersampling 문제와 관련이 있다.
- VK_FILTER_NEAREST 와 VK_FILTER_LINEAR 중에 선택해야 하며, 위에서 본 문제를 해결하기 위한 방법이다.
samplerInfo.addressModeU = VK_SAMPLER_ADDRESS_MODE_REPEAT;
samplerInfo.addressModeV = VK_SAMPLER_ADDRESS_MODE_REPEAT;
samplerInfo.addressModeW = VK_SAMPLER_ADDRESS_MODE_REPEAT;
- addressMode : addressing mode를 각 축마다 지정할 수 있다.
- - - - 축은 X, Y, Z 대신에 U, V, W 라고 하며, 이는 텍스쳐 공간좌표(texture space)에 대한 규칙이다.
- - - - 사용가능한 값은 아래와 같으며, 대부분은 위의 이미지에 나와있다.
- VK_SAMPLER_ADDRESS_MODE_REPEAT: Repeat the texture when going beyond the image dimensions.
- VK_SAMPLER_ADDRESS_MODE_MIRRORED_REPEAT: Like repeat, but inverts the coordinates to mirror the image when going beyond the dimensions.
- VK_SAMPLER_ADDRESS_MODE_CLAMP_TO_EDGE: Take the color of the edge closest to the coordinate beyond the image dimensions.
- VK_SAMPLER_ADDRESS_MODE_MIRROR_CLAMP_TO_EDGE: Like clamp to edge, but instead uses the edge opposite to the closest edge.
- VK_SAMPLER_ADDRESS_MODE_CLAMP_TO_BORDER: Return a solid color when sampling beyond the dimensions of the image.
- 여기서 사용하는 addressing mode는 이미지 외부의 sample을 사용하지 않기때문에 별로 중요하지않지만,
- repeat mode는 바닥과 벽과 같은 질감을 타일링하는데 사용하는 가장 일반적인모드이다.
samplerInfo.anisotropyEnable = VK_TRUE;

VkPhysicalDeviceProperties properties{};
vkGetPhysicalDeviceProperties(physicalDevice, &properties);
samplerInfo.maxAnisotropy = properties.limits.maxSamplerAnisotropy;
- anisotropyEnable : 등방성 필터링(anisotropic filtering) 활성화 여부 (Texel Anisotropic Filtering)
- - - - 성능이 문제가 되지 않는한 이것을 사용하지 않을 이유가 없다.
- maxAnisotropy : 최종 색상을 계산하는데 사용되는 최대 texel samples의 개수를 제한한다.
- - - - anisotropyEnable이 VK_TRUE일때 샘플러에서 사용하는 등방성 값 클램프로 VK_FALSE일때 무시됨
- - - - 낮은 값이면 더 좋은 성능을 얻을 수 있지만, 퀄리티가 낮다.
- - - - 어떤 값을 사용할 수 있는지 알아내려면, 다음과 같이 물리적 장치의 속성을 검색해야한다.
- - - - VkPhysicalDeviceProperties 구조체는 VkPhysicalDeviceLimits 타입인 멤버 limits 를 포함하고 있으며
- - - - limits는 maxAnisotropy 값으로 지정할 수 있는 최대값인 maxSamplerAnisotropy 멤버를 포함하고있다.
- - - - 만일 최고의 퀄리티를 원한다면, 이값을 직접 지정해주면된다.
samplerInfo.borderColor = VK_BORDER_COLOR_INT_OPAQUE_BLACK;- borderColor : border addressingmode로 클램프를 사용하여 이미지 외부를 샘플링할 때 반환되는 색상을 지정한다.
- - - - float나 int 타입인 black, white 그리고 transparent 를 지정할 수 있지만(VkBorderColor)
- - - - 임의의 색상을 지정할 수는 없다.
samplerInfo.unnormalizedCoordinates = VK_FALSE;- unnormalizedCoordinates : 이미지의 texels을 처리하는데 사용할 좌표계를 지정한다.
- - - - 만일 VK_TRUE 를 사용할 경우 간단하게 [0, texWidth) 와 [0, texHeight) 범위를 사용한다.
- - - - 만일 VK_FALSE 를 사용할 경우 [0, 1) 의 범위를 모든 축에 사용하여 지정된다.
- - - - 실제 응용프로그램은 대부분 항상 normalized coordinates를 사용한다.
- - - - 왜냐하면, 정확히 동일한 좌표로 해상도의 텍스처를 사용할 수 있기 때문이다.
samplerInfo.compareEnable = VK_FALSE;
samplerInfo.compareOp = VK_COMPARE_OP_ALWAYS;-compareEnable : 만일 comparison function이 활성화되어지면, texels은 먼저 값과 비교되고
- - - - 해당 비교 결과가 필터링 연산에 사용된다.
- - - - 주로 shadow map에서 percentage-closer filtering에 사용됨
- compareOp : 필터링하기전 가져온 데이터에 적용할 comparison function이 VkCompareOp 값으로 지정되어진다.
- 향후 챕터에서 살펴볼것이다.
samplerInfo.mipmapMode = VK_SAMPLER_MIPMAP_MODE_LINEAR;
samplerInfo.mipLodBias = 0.0f;
samplerInfo.minLod = 0.0f;
samplerInfo.maxLod = 0.0f;
- mipmapping 에 관련된 필드들로 later chapter에서 다룰것이다.
- mipmapping은 기본적으로 적용할 수 있는 또 다른 타입의 필터이다.
3.3.2 vkCreateSampler
- sampler의 기능이 이제 완전히 정의되었다.
- sampler object 핸들을 보유할 클래스맴버를 추가하고 vkCreateSampler함수를 통해 생성하자
VkImageView textureImageView;
VkSampler textureSampler;

...

void createTextureSampler() {
    ...

    if (vkCreateSampler(device, &samplerInfo, nullptr, &textureSampler) != VK_SUCCESS) {
        throw std::runtime_error("failed to create texture sampler!");
    }
}
- sampler를 생성할때 VkImage 에 대한 참조가 어느곳에도 없다.
- sampler는 텍스쳐에서 색상을 추출하는 인터페이스를 제공하는 별개의 객체이다.
- 이것은 차원과 관계없이 사용자가 원하는 모든 이미지에 적용시킬 수 있다. (1D,2D,3D 다 가능)
- 이것은 텍스처 이미지와 필터링을 단일 상태로 결합했던 많은 구 API들과의 차이점이다.
3.4 vkDestroySampler
- 더이상 이미지에 접근하지않는 프로그램 끝에서 제거해줘야한다.
void cleanup() {
    cleanupSwapChain();

    vkDestroySampler(device, textureSampler, nullptr);
    vkDestroyImageView(device, textureImageView, nullptr);

    ...
}
4. Anisotropy device feature
- 만일 지금 프로그램을 실행하게되면 유효성 검사 레이어에서 다음과 같은 메시지를 볼 수 있을 것이다.

- 이것은 anisotropic filtering이 실제로 선택적인 device feature이기 때문에 발생하는 문제이다.
- 그러므로 createLogicalDevice 함수를 업데이트하여 이 기능을 요구할 필요가 있다.
VkPhysicalDeviceFeatures deviceFeatures{};
deviceFeatures.samplerAnisotropy = VK_TRUE;
- 최신 그래픽 카드가 이를 지원하지 않을 가능성은 매우 낮지만,
- 사용가능한지 확인하기 위해 isDeviceSuitable 함수를 아래와같이 업데이트해줘야한다.
bool isDeviceSuitable(VkPhysicalDevice device) {
    ...

    VkPhysicalDeviceFeatures supportedFeatures;
    vkGetPhysicalDeviceFeatures(device, &supportedFeatures);

    return indices.isComplete() && extensionsSupported && swapChainAdequate && supportedFeatures.samplerAnisotropy;
}
- vkGetPhysicalDeviceFeatures 을 통해 VkPhysicalDeviceFeatures 구조체의 용도를 변경하여
- boolean 값을 설정하여 요청하지 않고 지원되는 기능을 나타낼 수 있다.
(The vkGetPhysicalDeviceFeatures repurposes the VkPhysicalDeviceFeatures struct to indicate which features are supported
rather than requested by setting the boolean values.)
- 등방성 필터링을 지원하는지를 요구하는대신, 단순히 비활성화하여 사용하지 않을 수 도 있다.
(Instead of enforcing the availability of anisotropic filtering, it's also possible to simply not use it by conditionally setting)
samplerInfo.anisotropyEnable = VK_FALSE;
samplerInfo.maxAnisotropy = 1.0f;
- 다음 챕터에서는 이미지와 샘플러 객체를 셰이더에 노출시켜 정사각형에 텍스처를 그릴것이다.
C++ code / Vertex shader / Fragment shader
https://vulkan-tutorial.com/en/Texture_mapping/Image_view_and_sampler
'그래픽스 > vk' 카테고리의 다른 글
| [vk] Depth buffering (0) | 2021.09.04 |
|---|---|
| [vk] Texture Mapping - Combined image sampler (0) | 2021.08.16 |
| [vk] Texture Mapping - Images (0) | 2021.08.16 |
| [vk] Uniform buffers - Descriptor pool and sets (0) | 2021.08.16 |
| [vk] Uniform buffers - Descriptor layout and buffer (0) | 2021.08.16 |